

Sometimes I get lucky. Digicats(and Dogs) has a new series of cute kits, & since I'm on CT for 2 of the stores she sells at, I got to work with both kits she has released thus far.
What I used:
Tag kit by Digicats (& Dogs) called “Fox and Hound”
http://sophisti-scraps.com/index.php?main_page=product_info&cPath=1_102&products_id=969
Adobe Photo Shop Creative Suite 4.0
(For ease in resizing make sure Show Transform Controls is checked. In PSE the equivalent is Show Bounding Box, while in PSP make sure your Pick tool is operative, then simply adjust item size by moving the corners of the box around it.)
What I did:
1. Open a blank transparent canvas 600 pixels x 600 pixels & use the circular selection tool to draw a large circle. Fill the circle with background of choice (paper 5).
2. Create a new layer & use preset shapes to draw a large paw print in the center of the circle. Fill the paw print with the background of choice (paper 3) by using new fill layer with use previous layer to create clipping mask checked off.
3. Select a grassy border (grassy border 2), copy & paste, adjusting for size. Use the lasso tool to trim the grassy border to better fit tag, if desired. Apply bevel & emboss effect.
4. Copy & paste posers, adjusting for size as needed. In this case I am using both Foxy 1& Freckles 2, which are both included in the kit. Apply bevel & emboss effect to each poser.
5. Choose a butterfly or dragonfly (dragonfly1). Copy & paste, adjusting for size as desired. Apply bevel & emboss effect.
6. Enter desired text. In this case I used Sandy Text HMK 14. From Styles>text effects2 I used white ghosted outer glow for the main words & inverse bevel with shadow for the name. If you are using a different graphics program, experiment to find an effect you like. Use a smaller font to apply tag information along the bottom.
7. Merge visible & save.
 Enjoy, & stay tuned for creations from the second kit, in the next post.
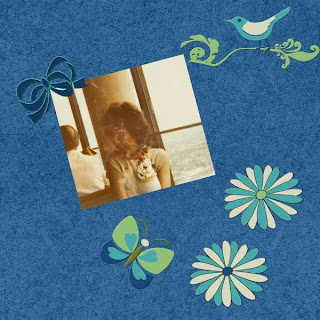
First off we have Fox & Hound. 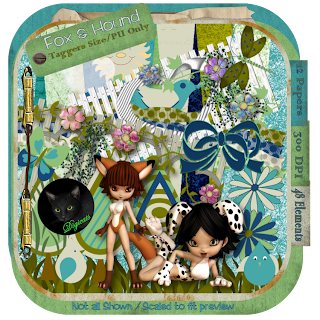
I did 2 layouts & made quick pages based on those layouts, plus a tag with tutorial.
What I used:
Tag kit by Digicats (& Dogs) called “Fox and Hound”
http://sophisti-scraps.com/index.php?main_page=product_info&cPath=1_102&products_id=969
Adobe Photo Shop Creative Suite 4.0
(For ease in resizing make sure Show Transform Controls is checked. In PSE the equivalent is Show Bounding Box, while in PSP make sure your Pick tool is operative, then simply adjust item size by moving the corners of the box around it.)
What I did:
1. Open a blank transparent canvas 600 pixels x 600 pixels & use the circular selection tool to draw a large circle. Fill the circle with background of choice (paper 5).
2. Create a new layer & use preset shapes to draw a large paw print in the center of the circle. Fill the paw print with the background of choice (paper 3) by using new fill layer with use previous layer to create clipping mask checked off.
3. Select a grassy border (grassy border 2), copy & paste, adjusting for size. Use the lasso tool to trim the grassy border to better fit tag, if desired. Apply bevel & emboss effect.
4. Copy & paste posers, adjusting for size as needed. In this case I am using both Foxy 1& Freckles 2, which are both included in the kit. Apply bevel & emboss effect to each poser.
5. Choose a butterfly or dragonfly (dragonfly1). Copy & paste, adjusting for size as desired. Apply bevel & emboss effect.
6. Enter desired text. In this case I used Sandy Text HMK 14. From Styles>text effects2 I used white ghosted outer glow for the main words & inverse bevel with shadow for the name. If you are using a different graphics program, experiment to find an effect you like. Use a smaller font to apply tag information along the bottom.
7. Merge visible & save.
Enjoy, & stay tuned for creations from the second kit, in the next post.


No comments:
Post a Comment