Friday, December 31, 2010

December 2010 DSO colour challenge


Despite getting an early start on the December 2010 colour challenge at DSO, illness sidelined me enough this month that I just finished the kit last night & set it to upload to Mediafire while I slept.
I really had fun making this one, & as usual, it is far from being a "mini" kit.

C-C-Cold is loaded into a main folder, but in case there is a problem with that download link, I'll also list the links for each of the 20 zips - 36 papers & over 300 elements.
Just a few gentle reminders - the zips are sized 28-30mb for the benefit of those on dial-up; the kit is strictly personal use only; don't share the download links, share the link to the post on my blog; please consider taking a moment to comment because it's easy to get discouraged when nobody bothers to say 'Thank you".
Today is the last day of 2010. Everyone stay safe tonight.
Enjoy

Monday, December 20, 2010

Winter's Blush


I may hate real snow, but winter theme kits do make pretty pages & tags. Kissed by Pix has a very nice new kit called Winter's Blush, available in full & tag size.

I've made a set of 2 quick pages using the full size kit.


I also made a tag in 2 versions, but in order to get the tag exactly as I envisioned, I imported effects from one software into another, so it's not a tag I choose to make a tut for.


Enjoy

Wednesday, December 8, 2010

Winter Frost


Brrr. Pass the cocoa, someone, please.

I've been working with Stargazer Musings newest kit, Winter Frost.


I made a set of 2 quick pages, another January 2011 desktop calendar, & a tag with tutorial. The download link for the quick pages & calendar set is on mediafire.


Tag tutorial:
I used Adobe Photoshop Creative Suite because I knew I wanted to use styles. Make sure "show transform controls" is checked for easy resizing of elements.

1. Open a blank transparent canvas 600 pixels x 600 pixels. Use circular selection tool to create a circle, & fill with the background of your choice (paper 3).
2. Choose a circular frame (diamond frame 1), copy, paste, resize & position so the circle is framed.
3. Choose a word art (word art 4), copy, paste, & resize to your liking. Set opacity to about 40%. Repeat 2 more times.
4. Choose a complementary background element (poinsettia cluster), copy, paste & resize, setting opacity to 70%.
5. Choose a poser. I used Snow elf 1 by Medievil Creations. Copy, paste, resize as needed, & position as desired.
6. Choose a decorative element (pinecone 1) 7 copy, paste, resize, & position as desired. Add a star (star 1) if desired.
7. Enter desired text. For the main captioning I used Kingthings Christmas 12 & applied a blue glass style. for the name I used Baroque Script 8 & applied a coloured foil style from Krissy's Scraps. For tag credit I used Arial size 3.
8. When you are happy with your final tag, merge visible & save.

Enjoy

Sunday, November 28, 2010

gorgeous Georgetta Cartrite


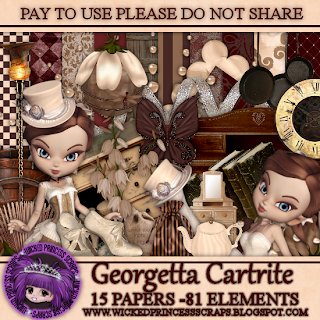
A while back I played with Wicked Princess' kit Victoria Dove & really enjoyed working with it. Well, she has a new kit along a similar theme, called Georgetta Cartrite, available in both tag & full sizes, & it is so gorgeous! I just had to play with it! There are so many wonderful elements, it's hard to choose which ones to use. there are also some lovely posers by Lisa K of Sophisticated Imaging.


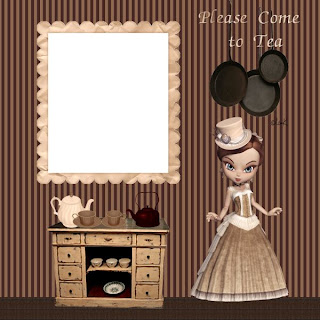
I decided to get the January 2011 desktop calendar done early & I've also made you a quick page to go with it. I put them both in the same zip, so I hope you like both.


I also made a tag. I used Adobe PhotoShop Creative Suite 4, but this simple tag can be made using any of the major graphic programs. With PSCS, make sure "show transform controls" is checked, while with PS Elements, it's "show bounding box" & with PSP, it's having the pick tool enabled - this allows for easy resizing of elements.


1. Start with a transparent canvas 600 pixels x 600 pixels. Use your circular selection tool to create a circle & fill it with the background of your choice (paper 11 at 30%).
2. Now you pick your elements, each of which you will copy, paste, resize as needed, & position as desired in turn. It's always best to have your layer palette loaded & visible off to the side. I actually started with the door & moved about in the layers palette to add the largre compass underneath (set at 55% opacity) later.
3. I used bevel & emboss effect on the door, as well as outer glow, to imply the door is slightly ajar. There are a variety of elements to choose as your traveler's luggage. I used trunk, hatbox, round hatbox, round box, birdcage, & compass, but you may decide to use a different combination.

4. Choose your poser. I used Georgetta turned, flipped the poser horizontally, & applied the bevel & emboss effect. I had to delete the flipped copyright & recopy & paste it so it was legible.

5. Choose your font for your text. (If you are using PSP, you may choose to create your initial circle with preset shapes in order to use the curved text on a vector shape feature, with the curved text icon prompt. In this case it will be easier to do the curved text as step 2.) I used a font called Victorian for the main text, right clicked on the text in the layers palette & chose warp text, arch, adjusting the amount of curve to taste. then I applied a style from Wetfish designs. I used a font called Whimsical for the name & applied another style from the same set.

I adjusted the font to a small size to add tag info. Never forget to include the crucial credit information. If you use licensed posers it is also crucial to include your licenxe number.

6. When you are satisfied with your tag save it. I save in the program format with layers intact & then save a merged copy in png format.


Enjoy.

Thursday, November 25, 2010

December 2010 desktop calendar


I backtracked to Stacey's Designs kit Cold Hands, Warm Hearts to make the new desktop calendar freebie.

Enjoy.

Sunday, November 21, 2010

Snowflakes of the virtual kind


It's one of my inherent contradictions - I hate snow but love snowmen. Snow may look pretty, especially when it's newly fallen, but any sense of enchantment is short-lived thanks to the cold and the mess. So I prefer virtual snow, like the kind in Digicats (and Dogs)'s latest kit Snowflakes

I've made 2 lovely quick pages to share with you I also made 2 easy-to-do tags. Both are simple, you choose your background paper, decide your basic shape and fill with that background, then choose your desired elements and "copy, paste, resize as needed, position as desired". Choose your poser, if desired, and copy, paste, resize, and position. Whether you use one of the posers included in the kit, or different poser, please be certain you credit the poser creator properly on the tag - it's very important. I use a small, inconspicuous, but still visible font for tag information, usually Arial 3-4. For any desired text or name, you may need to experiment.


For "Good friends" I used paper 19 filling a circle shape, added a snowman cluster, the snowman you see holding the water globe, and the water globe, and used the font ‘Kingthings Christmas’.


For "Season's Greetings", I used paper 18, the wreath, bauble 1, bells, and kitty, along with a poser from Angelic Posers (Brynn3). After much experimentation, I settled on a font called ‘Christmas Card’.

Enjoy.

Wednesday, November 10, 2010

Cold Days Warm Hearts

photo credit Joe Tyson

Stacey's Designs has an adorable new kit Cold Days Warm Hearts jammed packed with snowmen & skating teddy bears.


I did 3 layouts - for 2 of the layouts I scrapped photos from a skiing party in January 2009, for the other I used a stock photo from Joe Tyson. Thanks for a great photo, Joe.


I then made a set of 3 quick pages based on these layouts.

Then I made a tag. This time I used Paint Shop Pro, because I wanted to wrap words around the tag.

Open a new blank canvas 700 pixels x 700 pixels. Set your background of choice (paper 6 at 10%) as background & foreground & use preset shapes to create a circle.

Choose the text tool, then change the background & foreground colour to the text colour, choose the font (Kingthing's Christmas 52), when the text icon for curved text appears, type the desired text.

Create new layer, choose background & foreground material (paper 10), choose preset shapes & create a heart.

Choose a snowman element (lighted snowman couple), copy & paste, resizing as needed.

Use a smaller font for name (Antsy Pants 24) & tag information (Arial 05).

Merge visible & save.

Enjoy.

Thursday, October 28, 2010

Working on a new kit - quick page freebie


I'm working on a new kit, inspired by the October colour challenge at Divine Digital's forum. The challenge is layouts only, so I used some of what I have created thus far to do a layout. I also made the layout into a quick page freebie for you.
Enjoy.

November 2010 Desktop Calendar


Time to post the November 2010 desktop calendar freebie. I used Rieka Rafita's Love of Autumn, currently on sale for only $1.

Personal use only, please.
Enjoy

Tuesday, October 26, 2010

missing link for Sweet Summer Memories

so sorry I don't know why zip08 didn't load into the folder
I've got it in there now

Tuesday, October 12, 2010

October 2010 DSO colour challenge


DSO colour challenge time again. Got this one down to 6 zips - lol - not quite a mini, but smaller than I usually end up with.
Tea Party in the Playroom takes me back to the days when I was very young & loved to play tea party.
Please leave a comment either with the post or in the chat box if you download?
Enjoy


Wednesday, October 6, 2010

tags with The Wings of Spring


I bought Crazed Creations' Wings of Spring many months ago & finally got around to working with it -lol. Currently the kit is on sale for a low price at Scraps With Attitude.

This kit was very enjoyable to work with. And the posers from Luscious Scraps are so cute!
Enjoy


some new tags - Total Eclipse


I'm having trouble with my wrist & typing hurts, so for the next little while I'm going to be posting tags without accompanying tuts.
Nette's Night Owl Works has all her kits at The Creativity Box. I was drawn to her kit Total Eclipse because of the colour scheme. I love that particular shade of blue.

These were both simple tags to make, basic Copy & Paste, although I did play with the opacity of the tree in the Dream of Me tag & applied a style to the name to make it show up on the candle.
Any questions can be left as comments or in my chat box.
Enjoy

Sunday, October 3, 2010

Victoria's Musings

Scrappin With Lil Ole Me has a really great sale on right now. I put her Victoria's Musings tag kit to very productive use. Created at 300 dpi, it works as well for layouts as for tags. Right now it's on sale for 75% off, $0.75!!
I made 2 layouts, then turned the layouts into a set of quick pages for you.


I also made 2 tags. The kit comes with 4 lovely posers from Wyked Soulz but I used a poser from Medievil Creations for one tag and a poser from Dark Moon's Dreams for the other.

Personally, I like to use Adobe Photoshop Creative Suite 4 to make my tags. I like using the bevel & emboss effect to make elements stand out. I'm not tuting these tags, but it's really simple - choose the elements you want to use, then copy, paste, resize & arrange to fit your
vision. Apply effects like bevel & emboss if desired. Experiment, play, have fun. Keep your layers palette visible & you can turn any given element's visibility on or off to deside if it looks right.
Enjoy.


Saturday, September 25, 2010

Awaiting Autumn


Awaiting Autumn is a vividly coloured kit & I used the kit to make 2 layouts, along with a matching set of quick pages for you to download.


I also created a tag & wrote a basic tutorial for it.

Meet Me Under the Moon
-using Awaiting Autumn by Mystical Illusionz, which includes posers by Lisa of Sophisticated Scraps
-software: Adobe Photoshop Creative Suite 4 (note - ensure "show transform controls" is checked, for easy resizing of elements)

1. Open a new transparent document 700 pixels x 700 pixels. Use circular selection tool to create a circle. Fill the circle with the background of your choice (paper 4, at 10% setting).

2. Select your elements of choice (moon, leaf 1, 2, 3). One by one copy and paste each element, adjusting for size as needed, and positioning as desired. I applied bevel & emboss effect to each element, as well as outer glow.

3. Copy & paste your poser of choice (cookie by Lisa 4). Position as desired, apply bevel & emboss effect and outer glow effect.

4. Enter desired text in font of choice (Renaissance 12). To curve text, right click on the text in the layers palette, choose "warp text" then "arch". If desired apply a style to the name. For tag information I use Arial4.

5. Merge visible & save.


If you are interested, this kit is currently on sale 40% off.
Enjoy