
The minute I saw the latest kit by Wacky Winnie Designz, I just had to work with it! It's called My Blue Christmas, but what grabbed my eye was the snowmen! I love working with snowmen!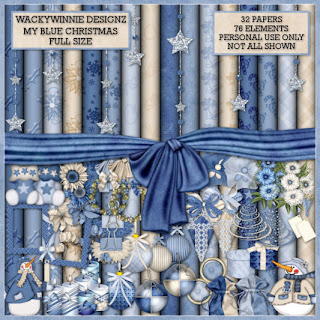

It comes in both full & tag size. I used full size so I could make both some quick pages for you & some tags.

Tutorial for “Love Warms Body & Soul”
What I used:
Scrap kit from Wacky Winnie Designz called “My Blue Christmas” available in both full & tag size. Visit her blog www.wackywinniedesignz.blogspot.com for the list of stores her products are sold at.
Posers from Medi Evil’s Creations www.medisaddiction.blogspot.com.
PSP XI (I keep the pick tool enabled because it allows for easy resizing of elements. In Adobe programs make certain either the show transform controls box is checked or the show bounding box.)
What I did:
If you want to have text on the outside path of your tag, you have to decide that before you begin because text has to be placed on a vector layer & as soon as you work with the background, it will prompt you for a conversion to being a raster layer. I do not know how to place text on a path in Adobe programs – if anyone has an easy tutorial on how to do this, please share it with me.
1. Open a new transparent canvas 700 pixels x 700 pixels. Make sure both your background & foreground materials are the same colour. You will change the actual background later, so go with a plain colour. Use your preset shape tool to create a circle.
Now select your text tool & hover where you wish to place the text. A small icon of an “A” above a curve should appear. Click & type your desired text in the pop up box. Do not click apply text yet. Highlight desired text within the pop up box & then click on your background & foreground colours palette & select your desired colour for the text. Do not use the same colours as your preset shape. Click “apply” command in the text pop up box. Now use your magic wand to highlight your preset shape & fill with the background material of your choice (paper 19). You will be prompted to change to layer into a raster layer, click ok.
2. Choose a “rain” element (rain 1). Copy & paste the element, resizing to fit, & using the lasso tool to trim the element to conform to the circular shape of the tag.
3. Choose the snowman elements (snowman 1 & 2), mirroring one of them before the copy & paste. Adjust for size as desired – both are originally the same size but I chose to make one larger than the other. Apply Effect>3D>Inner Bevel. (I no longer remember what my default bevel is, sorry, but experiment to find what you like.)
4. If your poser of choice is sitting, choose a gift box for the poser to sit upon (gift box 3).
5. Copy & paste your poser of choice (Medi-the frosts). Resize & position as desired. Apply inner bevel effect.
6. Depending on your poser choice, you may wish to choose elements to place in the hands. I chose bougainville 1 to place in the girl’s hands & candy cane 2 to place in the boy’s hand.
7. Enter any other main text. In this case, I used Cataneo 11. Use a smaller font for tag information.
8. Merge visible & save.
 Tutorial for “Decorate Your Heart”
What I used:
Scrap kit from Wacky Winnie Designz called “My Blue Christmas” available in both full & tag size. Visit her blog www.wackywinniedesignz.blogspot.com for the list of stores her products are sold at.
Posers from Medi Evil’s Creations www.medisaddiction.blogspot.com.
PSP XI (I keep the pick tool enabled because it allows for easy resizing of elements. In Adobe programs make certain either the show transform controls box is checked or the show bounding box.)
What I did:
If you want to have text on the outside path of your tag, you have to decide that before you begin because text has to be placed on a vector layer & as soon as you work with the background, it will prompt you for a conversion to being a raster layer. I do not know how to place text on a path in Adobe programs – if anyone has an easy tutorial on how to do this, please share it with me.
1. Open a new transparent canvas 700 pixels x 700 pixels. Make sure both your background & foreground materials are the same colour. You will change the actual background later, so go with a plain colour. Use your preset shape tool to create a circle.
Now select your text tool & hover where you wish to place the text. A small icon of an “A” above a curve should appear. Click & type your desired text in the pop up box. Do not click apply text yet. Highlight desired text within the pop up box & then click on your background & foreground colours palette & select your desired colour for the text. Do not use the same colours as your preset shape. Click “apply” command in the text pop up box. I used Cataneo 11 & applied Effects>3D>chisel>thin white. Now use your magic wand to highlight your preset shape & fill with the background material of your choice (paper 25). You will be prompted to change to layer into a raster layer, click ok.
2. Choose a tree (tree 1). Copy & paste, adjusting size so tat tree is nicely centered. Apply Effects>3D>inner bevel.
3. Choose gift box elements (gift box 1, 2, 3,4). Copy & paste desired number, resizing each & positioning as desired. Apply inner bevel effect to each.
4. Copy & paste desired poser (Medi-snow queen 5). Adjust poser size & position as desired. Apply inner bevel effect. In this case I also chose an element (ball 3) to place in the poser’s hands & applied inner bevel after the copy, paste, resize & position.
5. Add any further desired text in same font as the curved text & apply the same effects. Use a smaller font without effects for tag information.
6. Merge visible & save.
 Enjoy
Enjoy





1 comment:
Thank you so much for sharing very pretty and a Happy New Year to you :O)
Post a Comment